Images upload & gallery link
| Line 9: | Line 9: | ||
==Upload of multiple images through [https://www.mediawiki.org/wiki/Extension:WikiEditor WikiEditor]== | ==Upload of multiple images through [https://www.mediawiki.org/wiki/Extension:WikiEditor WikiEditor]== | ||
| − | <html><span style="font-size: 32px;line-height: 1em;padding-right: 6px" class="BroadcastMatter">Cultura italiana</span></html> offers a forked version of [https://www.mediawiki.org/wiki/Extension:MsUpload MsUpload] in order to automatically upload multiple pictures at a given path. | + | <html><span style="font-size: 32px;line-height: 1em;padding-right: 6px" class="BroadcastMatter">Cultura italiana</span></html> offers a forked version of [https://www.mediawiki.org/wiki/Extension:MsUpload MsUpload] in order to automatically upload multiple pictures at a given path. Open the wiki-text editor through the button "Edit" on the page menu on top, and then click the upload button shown in the picture below: |
[[File:Instructions for use/Upload-screenshot a.jpg|thumb|alt=|none]] | [[File:Instructions for use/Upload-screenshot a.jpg|thumb|alt=|none]] | ||
| Line 19: | Line 19: | ||
<html><span style="font-size: 32px;line-height: 1em;padding-right: 6px" class="BroadcastMatter">Cultura italiana</span></html> offers a forked version of [https://www.mediawiki.org/wiki/Extension:VisualEditor VisualEditor] in order to automatically upload pictures at a given path (typically that of the current page) or to browse among pictures contained within a given path (typically the one corresponding to an organization, including its sub-pages) and to insert them using Visual editor's Media gallery. Just follow these steps to upload a new picture or to insert an existing picture in the current page. | <html><span style="font-size: 32px;line-height: 1em;padding-right: 6px" class="BroadcastMatter">Cultura italiana</span></html> offers a forked version of [https://www.mediawiki.org/wiki/Extension:VisualEditor VisualEditor] in order to automatically upload pictures at a given path (typically that of the current page) or to browse among pictures contained within a given path (typically the one corresponding to an organization, including its sub-pages) and to insert them using Visual editor's Media gallery. Just follow these steps to upload a new picture or to insert an existing picture in the current page. | ||
| − | + | After opening Visual editor through the "Edit" button in the page menu on top, click "Insert" and then "Media" in the dropdown menu. | |
[[File:Instructions for use/Upload-screenshot e.jpg|thumb|alt=|none]] | [[File:Instructions for use/Upload-screenshot e.jpg|thumb|alt=|none]] | ||
| Line 30: | Line 30: | ||
[[File:Visual editor upload image.jpg|none|thumb]] | [[File:Visual editor upload image.jpg|none|thumb]] | ||
| − | After | + | After the upload you will be able to specify where to save that picture. Managers of Italian culture and language center can save their pictures under the main page of their organization or in whatever subpage of it. Administrators can save pictures also at root level ('/'). |
[[File:Instructions for use/Upload-screenshot c.jpg|thumb|alt=|none]] | [[File:Instructions for use/Upload-screenshot c.jpg|thumb|alt=|none]] | ||
Revision as of 17:48, 24 August 2020
The mediawiki version (1.34) powering this platform has been enhanced in order to support the storage of images and media files at a specific path, so that each organization can save all their images within a specific "folder" (under the main page itself of the organization, or whatever subpage within it) and can easily retrieve them from the visual editor media gallery, without mixing up their files with those of other organizations, and without file names conflicts or restrictions.
Upload of multiple images through WikiEditor
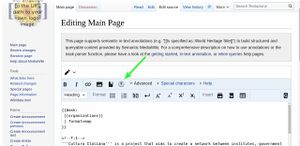
Cultura italiana offers a forked version of MsUpload in order to automatically upload multiple pictures at a given path. Open the wiki-text editor through the button "Edit" on the page menu on top, and then click the upload button shown in the picture below:
and include the uploaded pictures using the interface. They will be saved under the current page path, so the pictures filenames can be created according to that, and notwithstanding they can be inserted in other pages, following the instructions below, without the need to upload them again (inasmuch they become available in the Visual editor's Media gallery).
Upload of images through VisualEditor
Cultura italiana offers a forked version of VisualEditor in order to automatically upload pictures at a given path (typically that of the current page) or to browse among pictures contained within a given path (typically the one corresponding to an organization, including its sub-pages) and to insert them using Visual editor's Media gallery. Just follow these steps to upload a new picture or to insert an existing picture in the current page.
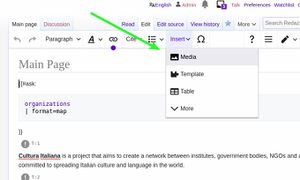
After opening Visual editor through the "Edit" button in the page menu on top, click "Insert" and then "Media" in the dropdown menu.
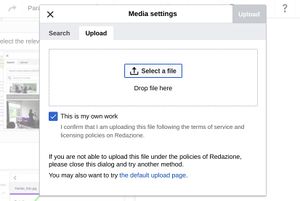
If you want to add a new picture then select the tab "upload" and upload the file.
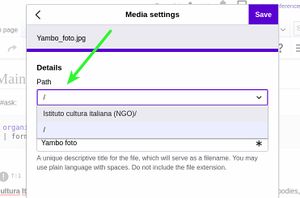
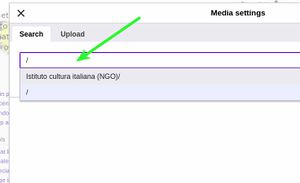
After the upload you will be able to specify where to save that picture. Managers of Italian culture and language center can save their pictures under the main page of their organization or in whatever subpage of it. Administrators can save pictures also at root level ('/').
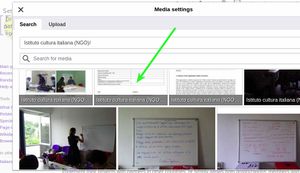
To insert an existing picture, select a root path where to search for existing pictures: typically it will correspond to the main page of your organization:
Select the relevant picture from the gallery to be inserted on the page
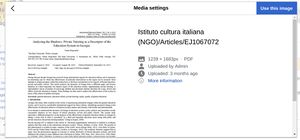
then click the top right button "use image" to include it on your page!
That's all! By this way pictures can be easily ordered and managed without filename conflicts and other limitations!
